91

Ease of filing taxes with Binance
Overall score: 91/100
Ease of filing taxes with Binance
Overall score: 91/100
Crypto taxes on Binance: You’re in the right place
Filing cryptocurrency taxes can feel overwhelming. The regulations are unclear, and official guidance often fails to answer all the important questions.
Meanwhile, tax authorities are gaining more and more access to data from crypto exchanges, including platforms like Binance. A growing number of exchanges are required to share information about your transactions.
That’s exactly why Divly exists. We created a tool that guides you step-by-step through filing your taxes in full compliance with local regulations, without the stress or uncertainty. In this guide, we’ll show you exactly how to report your transactions made on Binance.
What is Binance?
Binance, established in 2017, quickly ascended to prominence in the cryptocurrency world. It's renowned for being one of the largest and most versatile crypto exchanges globally, offering a wide array of services to users. These services include cryptocurrency trading, digital wallet facilities, and a platform for trading various digital assets.
Does Binance have taxes?
Yes, trading on Binance will for most people trigger taxable events that need to be declared. Binance offers a wide range of crypto services that have different tax consequences and reporting requirements.
There are too many transaction types and countries to cover in this guide, so please check with your specific country's guide on Divly or contact your tax authority for specific questions.
Does Binance report earnings?
Yes it is likely that Binance reports customers crypto activity to select tax authorities. For EU citizens this will become a certainty starting 1st January 2026 due to the new directive called DAC8. Other tax authorities like the HMRC are adopting similar standards that require crypto exchanges to report customer data.
Step 1: How to export your history from Binance
If you are planning to declare you crypto taxes, the first step required is to export your transaction history. Binance allows customers to export data via their API or by downloading a ZIP file. We strongly recommend downloading the ZIP file as our experience has shown that it is more complete and accurate for tax purposes.
File import
You can import transactions from Binance into Divly by downloading and importing a ZIP file. Make sure to download a new ZIP file every time you want to include the latest transactions.
- Sign in to Binance.
- In the navigation bar at the top, click on the Wallet icon and select Asset History from the dropdown menu.
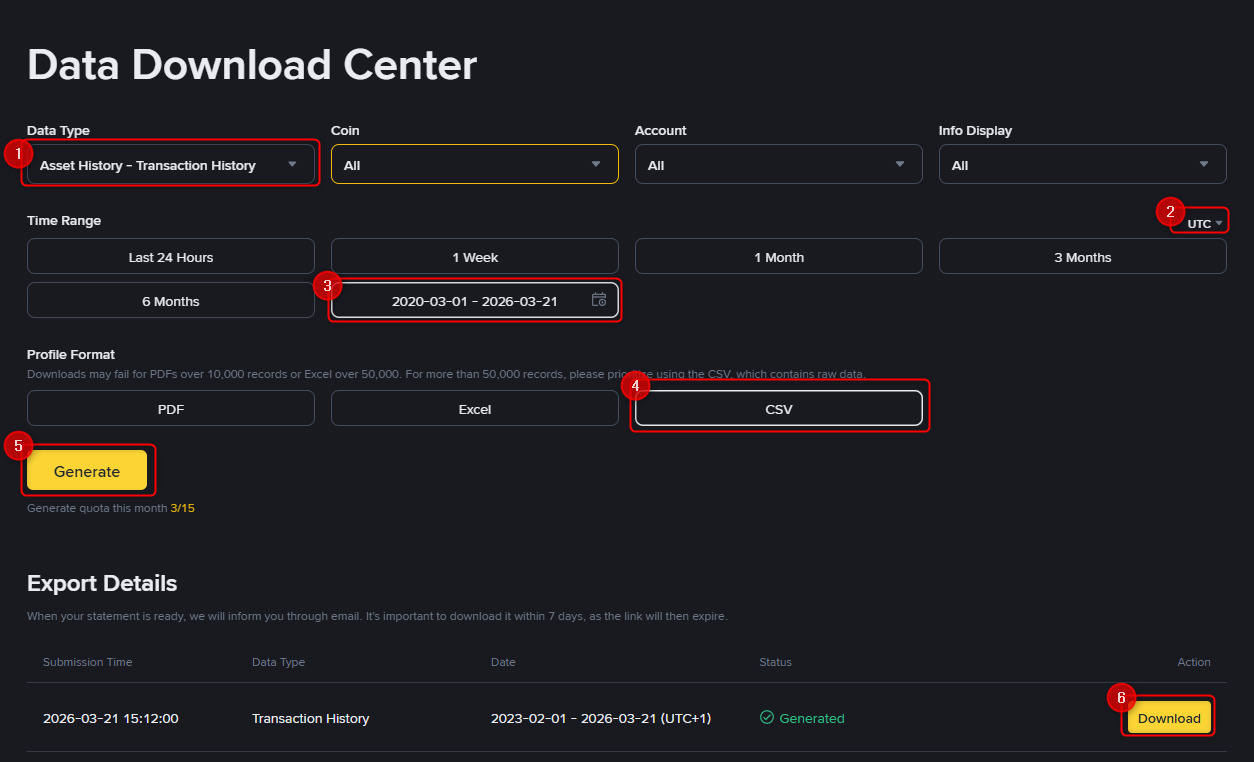
- In the top right, click on the Export icon and select Export Transaction Records from the dropdown. You will be redirected to the Data Download Center.
- Under Data Type → Leave everything on the default settings (Asset History – Transaction History). Ensure all other fields are set to All.
- Under Time Range → Select Customize → Choose a time interval that covers your full trading history.
- Very important!!! → Locate the small time zone selector (e.g., UTC+) above the “3 months” field. Click it and set it to UTC only (not UTC+ and not UTC-).
- Under Profile Format → Select CSV.
- Click the Generate button and download the file once it is ready.
- Drag and drop the ZIP file into Divly. Divly will import the transactions and calculate your taxes.
Step 2: How to calculate your crypto taxes
Once you have downloaded your transaction history, you will need to calculate your taxes and submit it in a format accepted by your tax authority. To be able to do this you have three options.
- Calculate your taxes in Excel
- Use a tax platform like Divly to automate the calculations for a small cost.
- Pay a tax lawyer by the hour to do it for you.
Each option has its pro's and con's and you will need to decide what price point and expertise you require. Each country has differing tax rules and difficulty levels associated with declaring taxes. This will affect your choice.
Step 3: How to declare crypto to your tax authority
Once you have finalized your calculations, you need to submit the numbers in a format accepted by your local tax authority. Formats and files differ between countries.
If you have used Divly, simply download your automated and localized tax report and follow the instructions provided in the file. It will lay out exactly where and what needs to be declared to your specific tax authority based on the country you selected when creating your account.
If you have any questions about declaring your Binance taxes feel free to reach out to our knowledgable support team by clicking on the chat icon in the bottom right of our website. Good luck!
 Why is Divly the best choice for Binance taxes?
Divly is built specifically for each country with a focus on accuracy. Unlike generic tools, we automatically generate the compliant, localized tax report you need for your country. We handle all the complex local rules of your local tax legislation so you don't have to.
-
Fast Import: Fast import of Binance transactions that combines with your other wallets/accounts.
-
Accurate Calculations: Accurate calculation of your taxes with gains/loss and the right cost method (e.g. FIFO).
-
Local Tax Report: Simple download of local tax report with guide on how to declare in your country.
Frequently asked questions (**FAQ?**)
Yes, in most countries you are required to pay taxes on crypto. For more details see your country-specific crypto tax guide.
Crypto typically incurs a capital gains tax in the majority of jurisdictions. This means you need to pay taxes on the difference between what you bought crypto for and what you sold it for (minus fees).
If you received crypto through other methods (e.g. salary), methods like income tax will apply.
Yes, you can use Divly to declare crypto taxes for previous years that you missed. In many countries you can self-report mistakes and not get penalized for it.
Divly provides localized guides on how to fix previous years for many of our supported countries.
It is a criminal offense to not pay your taxes. It is also difficult to avoid since crypto transactions are recorded publicly on the blockchain and exchanges have been forced to hand over information to local tax authorities.
Yes, you need to file a tax report even if you lost money. The good news is that by filing your losses you may be able to reduce your taxes.
Divly is a premium service to help people calculate and submit their crypto taxes. We use industry standard practices to secure your data.
- We do not sell your information to third parties such as other companies or government agencies.
- We do not perform any KYC. Divly only requires an email address and your pseudonymous crypto transactions to generate your taxes.
Feel free to use a temporary email / protonmail. You can also delete all your transactions and synched wallets at any time.
Yes. You can safely ask your accountant to create and manage a new Divly account for you, or invite them to see and/or edit your existing Divly account. Divly provides accountants with a special feature to manage multiple clients with crypto.
Any tax-related information provided by us is not tax advice, financial advice, accounting advice, or legal advice and cannot be used by you or any other party for the purpose of avoiding tax penalties. You should seek the advice of a tax professional regarding your particular circumstances. We make no claims, promises, or warranties about the accuracy of the information provided herein. Everything included herein is our opinion and not a statement of fact. This article may contain affiliate links.